Pi 4 USB Boot and 64bit Raspbian

Introduction

I have a perfectly working Raspberry Pi 4 1GB which is acting as a Samba server with a few TB of storage attached which we use to store our nightly backups, scanned and digital photos and a bunch of other stuff which is important to us. It was working well and didn’t need fixing or otherwise messing with at all.

Then the USB boot and 64 bit beta’s became available so I just had to try them out, didn’t I ?

Suffice to say that it all worked perfectly and now my Samba server has booted from a USB device and is running the new 64 bit beta OS.

Here’s how I did it.

USB Boot

All I did was to follow the instructions here. Please have a read of this most excellent doco before you do anything else.

Another thing that must be done before you start is to make sure that the proposed USB boot device works properly with your Pi. I have a couple here that work perfectly with Windows and iPad but just will not be recognised by Raspbian Buster.

Make a new SD card. I downloaded the image from the Raspberry Pi download page and put it on a new SD card using the Raspberry Pi Imager – Your mileage may vary if you use Balena Etcher or something else.

The next step is to put your image burner to use again and burn the image to the USB boot device that you will wish to boot from and put it to one side.

Boot from the new SD card that you just created and go through the setup process. Then do a “sudo apt update” followed by a “sudo apt full upgrade”. I rebooted the Pi at this stage. Next comes the first of the fun parts.

As root, edit /etc/default/rpi-eeprom-update and select BETA releases. I found that you need to have “beta” in lower case. Then do “sudo rpi-eeprom-update -d -f /lib/firmware/raspberrypi/bootloader/beta/pieeprom-2020-05-15.bin”

Do “rpi-update” and copy *.elf and *.dat from /boot to the boot partition on the USB device that you’ve put to one side. Do a “sudo poweroff” and remove the SD card. Reconnect the power and it should boot from the USB device if you’ve done it right.

I followed the instructions here and they proved to be invaluable. The whole operation worked properly the first time I tried it so follow the instructions in the doco and you’ll probably not go wrong. If it all goes wrong just go back to the beginning and start over.

I can still boot from my original SD card if I need to so I have a fallback if I need it.

64 bit Raspbian

While I was making my Pi boot from a USB device, Raspberry announced a 64 bit beta of Raspbian Buster. Of course, I just had to try it out in conjunction with USB booting.

I downloaded the 64 bit Buster image and using the Raspberry Pi Imager I prepared a USB SSD with it.

I did a “sudo poweroff” and swapped the USB devices over and plugged it back in. Imagine my surprise when it booted without any issues. I did the setup and I had a Pi with 64bit Raspbian Buster booted from a USB device. Not an SD card in sight..

Next was to get it updated and Samba installed. Again it went without a hitch. To make life a bit easier I copied fstab, /etc/dhcpcd.conf and smb.conf from my original SD card. “fstab” was not a direct replacement. I just edited the fstab (on the new 64 bit device) and put the mounts for my storage in it. The other two files were direct replacements though. Rebooted and it looks exactly the same as it did with the original SD card.

And it all came together

Well, at the end of the processes it all works perfectly. I’m sure that there will be more issues to overcome as the USB boot and 64 bit Raspbian move out of “beta” and into “production”

In the grand scheme of things it gained me exactly nothing apart from a bit more knowledge about the workings of the Pi and Raspbian.

I’m not touching the Pi that this web site is on – it’s a web server, a media player and store, a database server, etc. This Pi I regard as being critical and all precautions are taken to keep it up and running. I take nightly incremental backups and weekly full backups of the whole system including MariaDB database backups.

Sooner or later though, I’m going to have to bite the bullet and fully upgrade this Pi – a prospect that I’m most certainly not looking forward to.

LAMP+WordPress

Seeing as I managed to get USB boot and 64 bit Raspbian working so easily I figured that I may as well go for broke and get a duplicate of this web site happening.

First up I installed Apache, MariaDB, php and php-mysql. That was all very easy as it usually is.

Next up was to make a database for WordPress and create the relevant user. No problems here either. Then I installed the latest copy of WordPress and configured it. Again, no problems.

The bit that I expected the most trouble from was getting a copy of the WordPress installation and data across from this site to the new Pi configuration. All I did was to install the duplicator plugin on both sites and export it from this site and install it on the test Pi.

So now as well as Samba, I have LAMP+WordPress working. It’s hardly the definitive test, I know, but it’s an encouraging preview for when 64 bit Raspbian comes out of beta and into the real word.

Another good thing to come out of this exercise is that I may have discovered a path towards upgrading when USB boot and the 64 bit OS comes into prime time.

Why an Elecraft KX3

Everything else

Before the Elecraft KX3 was released I was using a Yaesu FT-817. I still have this radio and occasionally use it as an Echolink node. It has served me quite well but there were a few shortcomings both in the field and at home. In the field five watts and the lack of an internal ATU were my biggest frustrations. Having said that though, it’s a really portable package and gives good battery life. The two antenna connectors are very handy too. But the power connector is flimsy – I had to resolder mine – and is of an unusual size. Sure they can be got hold of easily but why not just use a more common size.

Then there’s the “blown finals” issue. The repair is easily done and the parts are affordable but why was the radio put on the market with such a glaring design fault.

Filters are an after market thing which is another frustration.

The Icom IC-703 was worthy of a look. It was big and heavy but the real show stopper was current drain on receive. It’ll suck batteries dry pretty quickly. I stopped looking at it when I discovered that.

At that stage there was no KX3 so the FT-817 was a no brainer and I got one. As I said, it’s served me very well. It’s done a number of outback, remote area bicycle trips being bounced around in a pannier and exposed to good old red dirt for weeks on end without issues. All that was needed was an antenna of some sort, an external ATU and a battery pack and it was good to go. The ATU is a home brew Z-Match using polyvaricons and a small toroid as well as some switched capacitors. It can handle the five watts from the FT-817 but I wouldn’t trust it with much more – maybe 10W at a stretch. For batteries I use a LiFePo4 pack and charger that I built up myself. Carrying batteries and charger around is something that will have to be done no matter which radio I have though.

And along came the Elecraft KX3

When the KX3 first came to my attention (before it was available) I did a lot of reading about it. It could be configured with an internal ATU and it seemed to be a Software Defined Radio with knobs which meant that with the optional filter I could have easily variable and tailorable filters. There was a 100W amplifier mooted as well as a panadapter. The more reading that I did the closer it seemed to be to what I wanted for both a portable and a home station. The only things missing was 2 metres and 23 cm both of which the FT-817 has. Given that I only rarely use those two bands that could be easily lived without. As a bonus, though, it had even lower battery drain than the FT-817 on receive.

Sure, the form factor was a bit bigger than the FT-817 and the layout was different but nothing that was a show stopper so I ordered one as a factory kit requiring assembly.

The assembly manual was spot on and I had no trouble putting it together. Following the Elecraft procedures the filter optimisation was a bit time consuming but it really is a breeze.

After a couple of nights with a glass or two of red it was ready to be fired up in anger. First impression was that the receiver was so much better than the FT-817. The roofing filter made separating signals easy. The audio equalisation (receive and transmit) made tailoring the the received audio easy.

It has a facility for up to eight macros that can be assigned. I’ve written a bit about that here.

Digital modes are a breeze – just select the right mode on the radio, plug it into the computer soundcard, load up the digital software of your choice and have at it. I use the DXLab Suite which can be used for radio control, logging, digital modes, etc.

Getting all that working perfectly was just so much easier than the FT-817. Elecraft have come up with a top notch product which suits my needs perfectly. I can use the radio as a home base radio, with the PX3 and the KXPA100, or as a portable radio when I’m out and about either in the camper or on my bicycle. With a decent antenna on the car it’ll also make a damn fine mobile radio.

A final word about the noise blanker and noise reduction. I drive a Land Rover Td5 Discovery 2. The Td5 engine has electronic unit injectors which make an incredible amount of electrical noise. With the FT-817 it was untameable. My original D2 almost had it’s own body weight of ferrite beads in it but anything less than a S9+10db signal just got lost in the din. With the KX3, careful setting of the NB and NR and a S5 signal was copyable.

The final word

Since I’ve had the KX3 I’ve got the PX3 panadapter and the KXP100 amplifier with built in ATU. It all works perfectly together and has provided me with many hours of pleasure. The inbuilt ATU manages to match just about any old bit of wire thrown in  a tree. Not the most efficient but you can make contacts, which after all is the object of the exercise.

The importance of backups

What happens when it all goes pear shape

A couple of days ago we had a small power “glitch” here. Apart from the microwave clock going back to zero and the TV going off the Raspberry Pi that this site runs on went down.

When I powered it back up I found that my WordPress site was devoid of content. Further panic stricken investigation revealed that the “wp_posts” table in the database had a corrupt index. After much gnashing of teeth, googling and experimenting (after taking a copy of course) I was unable to fix the problem.

What to do ? Well I bit the bullet and restored a backup I’d take about a week earlier using the “Updraft” plugin. Apart from losing a week’s worth of content all was well. And this is where good fortune stepped in.

During the couple of hours before the power glitch I’d been messing around putting an “RSS Subscribe” in the side bar and testing it on my iPhone. It proved to work well too so on a whim I had a look at the RSS on my phone and it had handily retained all of the content from this site so I was able to e-mail it to myself. From there it was a simple matter to copy and paste the content to the recreated posts. Whew.

The only thing that I lost was about a week’s worth of stats from “WP Statistics” plugin. I can live with that but I’d rather that I didn’t have to though.

OK so I was lucky

So, this time I was lucky ! I only lost a very minimal amount of stuff. The stats and the configuration for Google AdSense.

As a retired large system administrator I know full well the importance of good backups. I wasn’t taking them on a regular basis because “what could possibly go wrong”.

I’m now using a Linux backup package for the whole Pi and I’ve scheduled a backup of WordPress once a day. As well as that I’m taking an Updraft backup right atfer I do anything of any note to WordPress or the system as a whole.

Raspberry Pi and TVheadend

How to turn a standard definition TV into a HD TV using TVheadend

What you’ll need to get TVheadend up and running

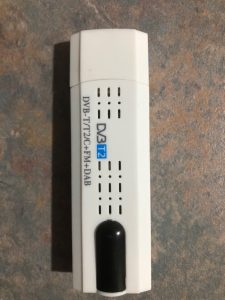
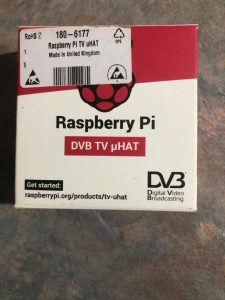
A Raspberry Pi 4 and a Raspberry Pi DVB TV Hat or a DVB-T/T2+C+FM+DAB dongle. You’ll also need a TV with HDMI input to plug the whole shooting match into.

The first thing to do is to get Raspbian installed and updated to the current standard. I didn’t pay any attention to secure passwords, etc. as this Pi is not going to be connected to the internet directly. Access is only going to be from the home network.

The next thing to do is to plug in either the Pi TV Hat

TV Hat

or your dongle.

DVB-T/T2/C+FM+DAB dongle


Next step is to install TVHeadend – “sudo apt install tvheadend” will get the job done. Before you start on the next step a very important step is to plug the antenna into either your TV Hat or dongle.

Getting it configured

When you are installing TVHeadend be sure that you select a username and a password combination that’s dead easy to remember.

When you’ve got it installed break out your trusty web browser and go to https://x.x.x.x:9981. The x.x.x.x could be localhost if you are doing it from either a TV or monitor connected to the Pi or it could be another system connected to your home network. In either case you’ll be prompted to supply the username and password that you specified during the TVheadend installation. You’ll be presented with a configuration page which is easy to work through. There’s a wealth of info at tvheadend.org which will see you right.

At this stage you should have an Electronic Programme Guide (EPG) visible in your browser and now’s the time to test it to see if it all works. If at this point if you have no success go back to the TVheadend configuration. It took me a few iterations to get a handle on how it works. Once you can see the EPG you’re home and hosed.

Be aware though, you really do need a decent TV antenna to get it working. I don’t think the receivers in either the dongle or the Pi TV hat are very sensitive. Another problem that I ran into was getting the correct region to scan. I started out using “au-other” which was incorrect. When I used “au-Melbourne” it worked as advertised. Like all of my other issues, it was my faulty configuration.

Testing and Job Done

At this point yould be able to select a programme in your browser. You now may have problems getting your browser to support the stream from TVheadend. Don’t worry, salvation is at hand in the form of VLC which can play network streams.

Just install it on the system that uses your old, slow, standard definition TV. Open it up and go to “media -> Network Stream” and enter the followung “https://username:password@x.x.x.x:9981/playlist/channels.m3u” where “x.x.x.x” is the network address of the system that uses your TV as the display. Or any other system on your local home network. You may have to select “View -> Playlist” from the menu to get the playlist. From there you just select the channel that you want. Double click on it and hit full screen mode.

Be aware though, you’ll need a high speed network connection between the system with TVheadend and the system with the TV attached. Of course if the system with TVheadend is directly connected to the TV then this is redundant.

With this setup I can take my tablet down the back yard to the BBQ area and kick back with the cricket and a glass of wine or two. I can’t watch HD TV there though – I’m only just in range of my 2.4GHz wifi which doesn’t quite cut it but hey, it does the job.

Sit back with a glass of your favourite and watch the programme of your choice in HD whilst congratulating yourself on a job well done.

The second last word

Since I got it working I have acquired a few Pi Zero’s for one thing or another and one of them has been pressed into service as my TVHeadend “Server” so I have a dedicated Pi Zero for TVHeadend.

It works every bit as well as the Pi 4 and it just sits alongside my media player Pi 4 behind the TV with only two connections – TV antenna and power. CPU utilisation is around 30% and the temp is around 40 deg C with them ambient at around 20 deg C.

The last word

If you’ve had a poke around this site you’ll see that my wife and I do a fair bit of travelling. One of the things that we take with us is a smallish 12 volt TV and an antenna. Sometimes, however, we get to a place where there is little to nil TV reception. No problem.

I’ve set up port forwarding on my router to allow a connection to my TVHeadend Pi. Using an app called “tvhclient” we can watch TV on my iPad or our iPhone’s. Although we use iPhone’s and an iPad the app is also available for Android. I’ve sort of tested it but the Android tablet I have is of such low power that it’s unworkable although it can get the channel list and attempt to display something.

In areas of good mobile phone signal we can watch high definition TV but usually it’s standard definition only. Of course the only programmes that we get to watch are those that are available on free to air TV at our home base though.

If we find a programme that we really want to see we can set TVHeadend to record it for us and then download it to my iPad and watch it at our leisure.

What seemed like a hare-brained idea turened out to be a good workable solution to what was a tiny problem.

This whole Raspberry Pi thing is getting more complex by the day such is the versatility of these small computers.


KX3 Macros

Macros in the KX3 are incredible useful. I have eight of them – a full complement. I use them to switch between using a headset, a microphone and speaker and microphone and earphones. I also use them for setting presets for voice equalisation, compression, etc.

Here’s a table of the macros  –  KX3 Macros in PDF format and KX3 Macros in Excel format

The first five macros are assigned to PF1 and they loop back. When you get to the WSJT macro another long press of PF1 will run the DX macro. The remaining three macros are are assigned to PF2 and operate in the same round-robin fashion.

If you decide to use these macros enter them in the KX3 utility from top to bottom macro one to eight.

The macro codes are all in the Elecraft Documentation but here’s a description of my macros. The elecraft documentation is sometimes not that easy to read but all the information is there.


Macro explanations

As promised, here’s an explanation of the macros that I use. The TE directive is Transmit Equalisation and the CP directive is Compression. Please bear in mind that these two are tailored to my voice as is MG.

The headset I use is the Heil Proset that I got from Elecraft when I bought my KX3. The microphone is the Elecraft MH3 hand microphone. The headphones that I use are Heil and are the same as the Proset.

Right let’s get to it…

DX macro

TE-16-16-06+00+06+12+12+09 gives me a response curve that suits my voice and the microphone element n the headset.

MD2 is operating mode USB. MG010 is microphone gain = 10. CP015 is set compression to 15 which is very high but it suites my voice. You will probably need to reduce this. Experimentation is the key here. AG010 is audio gain set to 10. PC050 is to set power to 50 watts (I have a KXP100).  SWT19 is a short press of the PRE button on the radio which toggles the preamp on and off. As the preamp will be off by the time we get back this macro we need to turn it on again.  MN110 sets the MACRO MENU FUNCTION. SWT27 selects the macro in position 2 SWH18 is a push and hold of PF1 which assigns the selected macro to PF1. MN255 exits the MACRO MENU FUNCTION.


HEIL macro

This macro changes the transmit equalisation to values suggested in the Heilsound web site. It also increases MIC GAIN. I don’t use this one much.

MN110;SWT20;SWH18;MN255 enters the MACRO FUNCTION MENU and assigns the macro in position 3 to PF1 and exits the MACRO MENU FUNCTION.

Elecraft macro

Again, this macro changes the transmit equalisation to suite my voice and the Elecraft MH3 microphone. It also changes the MIC GAIN and Compression.

MN110;SWT28;SWH18;MN255  enters the MACRO FUNCTION MENU and assigns the macro in position 4 to PF1 and exits the MACRO MENU FUNCTION.

PSK macro

This one sets the transmit EQ to flat, sets MIC GAIN to 10, MD6 (DATA) and DT0 (sub mode A) is to set the radio to DATA A. BW0400 is filter bandwidth in 10 Hz units. Compression is zero, power is 50W and audio gain is 20. The preamp is toggled off and the string MN110;SWT21;SWH18;MN255 assigns macro 5 to PF1

WSJT macro

This one is pretty much the same as the PSK macro. As everything is set up for digital mode I only needed to reduce AG (Audio Gain) to suite the WSJT software adjustment range.

The string MN110;SWT19;SWH18;MN255; assigns macro  1 to PF1.


That’s the end of the PF1 macros and what follows is the PF2 macros.

HSET macro

MN082 is the first part of setting MIC buttons and MP000 is a bit mask so 000 turns mic buttons OFF. The ML directive sets the monitor level. Power is set to 110W. The string MN110;SWT32;SWH26;MN255 assigns macro number 7 to PF2.

MIC macro

MN082 is the first part of setting MIC buttons and MP005 is a bit mask so 005 turns mic buttons ON. The ML directive sets the monitor level. Power is set to 110W. The string MN110;SWT33;SWH26;MN255 assigns macro number 8 to PF2.

M&H macro

This macro is for when I’m using headphones and the Elecraft MH3 hand mic.

MN082 is the first part of setting MIC buttons and MP005 is a bit mask so 005 turns mic buttons ON. The ML directive sets the monitor level. Power is set to 110W. The string MN110;SWT29;SWH26;MN255 assigns macro number 6 to PF2.


That’s the end of the description of the macros. I really, really hope that I haven’t got anything wrong that could mislead.

This set of macros means that I don’t have to do anything except press PF1 or PF2 and select the macro(s) to suit the current mode or circumstances.

Enjoy and have a play to make the best use of the KX3 abilities.

If you find any errors or see any glaring omissions PLEASE leave a comment so I can fix it.


More LAMP and WordPress

Well there have been some “developments” since I got LAMP and WordPress going.

I’ve tried and abandoned an e-mail server.

I’ve decided that 500GB of storage isn’t enough given our collection of “stuff” – you know, pictures, movies, TV series (Medici is good), music, etc. so I got my grubby fingers on a couple of 2TB Sandisk Extreme SSD drives. Using the same procedure I used to move the /root partition from the SD to the 500gb SSD I moved the /root partition again to a 2TB SSD. I left it as a single, big partition and made a mount point for the second 2TB SSD and put that in fstab using PARTUUID. I moved the contents of our ancient NAS drive onto that. It makes a huge difference to have a share (Samba and NFS) on a 1Gb network connection rather than the old 100baseT connection.

We now have more than enough storage for our foreseeable needs and it’s fast too. I’ll have to get a four port, powered USB 3 hub though. Copying downloaded stuff over the network or via USB 2 is slooooow compared to USB 3.

Meanwhile the Pi 4 4GB keeps on rocking along.

Getting e-mail happening

So I had this brainwave and thought it’d be a good idea to set up a Pi as an e-mail server. After all, how hard could it be, there are hundreds of thousands of mail servers around the globe that work well. What could possibly go wrong ?

I started out trying to keep it simple. I’m pretty familiar with Sendmail but I figured that I’d go with something simple as I was only going to serve two users and Sendmail seemed a lot of overkill.

After a bit of searching Citadel seemed to fit well. I installed it and configured but there is no way I could get past a couple of errors not the least if which is “db:cursor still in progress on cdb 02: attempt to write during a r/o cursor”. I tried a completely fresh install of Raspbian Buster with a brand new install of Citadel. Still no dice. Searched for more comprehensive doco but, again, to no avail. I reckon I just about wore out the search engines looking for a solution but still no illumination. I even tried downloading the source and buildin it from scratch. The same olf “db:cursor still in progress…” error persisted.

Scratch Citadel which is a pity really as I reckon it’d be the bees knees for a simple and small e-mail server.

On to Dovecot and Postfix. I had a few issues but by carefully following the documentation on Postfix.org I had it all up and running. In the beginning I had a lot of trouble getting “saslauthd” to do the authentication and I spent a goodish amount of time trying to treat the symptoms without success. At this point I decided to get rid of postfix and dovecot and start again from a new install of both. The big difference this time was that I folloed the docs on postfix.org to the letter. Surprise, surprise it all worked as it should.

After years and years of telling people to RTFM I didn’t.Once I did RTFM I proved my own point yet again.

Now came the hard part. DNS records. I use a dynamic DNS which has served me very well thus far. Setting up the MX record was very easy but I discovered I needed a PTR (for reverse lookups) and this is where the gremlins started to creep in. I needed a static address. No problem just ask my ISP, right ? Easily doable, for another ten bucks a month. Sign the static IP over to the dynamic DNS provider so that they can use it for all DNS records. ISP says – “oh no we can’t do that”. Luckily my dynamic DNS provider has a facility that can easily get around that particular scenario.

Now that it all works, I’m happy and am quite willing to advocate for the Postfix / Dovecot sulution. It’s a lot easier to configure than Sendmail. The configuration files are well commented and make sense, unlike Sendmail.

If you’re considering setting up your own mail server first check that you can get a PTR DNS record. If you can’t look for another solution. If you can, RTFM and pay attention to the details and recommendations.

Just for fun and games on our internal network I set up a DNS complete with MX and PTR records and with the internal e-mail system configured to insist on reverse lookups it worked perfectly with no errors. Of course this was only with two Pi’s, two PC’s and two windows tablets. I’ve got rid of it all now I know how to make it work and that there’s no point with an uncooperative ISP.

What to do with a second Pi

As the title asks – what to do with a second Pi ? I “accidentally” ended up with a Raspberry Pi 4 1GB to partner my 4GB unit so what to do with it.

The original Pi has LAMP installed and running well. It’s also got 1TB of storage for all my videos and photo’s and stuff and we use it to watch movie’s and TV series using our lounge room TV as the monitor. It works really, really well so I’m quite reluctant to change anything. It does need a fan heatsink though, to keep the temperatures under control. With the fan it only gets up to 55deg C max.

I have a USB DVB-T/2 dongle as well as a Pi TV hat. The TV hat doesn’t fit on my 4GB Pi because I have a fan case on it and a couple of the GPIO pins are used to power the fan. The TV Dongle was pressed into service and works OK with TV Headend. It’s not as sensitive as the Pi Hat despite using the same chipset so I pressed an RF amplifier into service in the antenna cable and it works a treat.

So. In the lounge room, behind the TV I have the 4GB Pi with a TV dongle and a 1TB SSD  with all my stuff attached. In the bedroom, where there’s no antenna socket, I have a smaller TV and a Pi 1GB. The Pi, using VLC, can play the TV from the lounge room Pi running TV Headend and using Samba can also play, using VLC again, all of our shows and movies.

Given that we’ve got good WiFi 5GHz coverage throughout the house thanks to a couple of WiFi extenders, for our grandson and visitors all I need to do to give them HD TV and shows and movies is to move the Pi and give them a keyboard. Our grandson can watch his Youtube stuff to his hearts content without annoying us.

Seeing as how successful that is I reckon another Pi to use for the same purpose in the BBQ area out the back could be the go. Watching the cricket while we’re having a BBQ and a few beers sounds pretty appealing to me. Setup is easy – Latest Raspbian with VLC, power supply and HDMI cable. Seems a bit of a waste of a Pi 4 though. I’ll have to have a look at the specs and get a few opinions of the capabilities of “lesser” and cheaper Pi’s and maybe get a couple more.

Moving the root partition.

This a summary of an article describing how to move the root partition found on the Raspberry Pi Forums .

Before you do anything do a “lsusb”without your external storage plugged in. Then plug in your external storage and do a “lsusb” again to make sure that your storage is going to work OK.

Before you start give a bit of thought as to how you want your storage partitioned. I just left my SSD as a single 500GB partition. In the future I can see that I’ll be adding more to house my collection of music and videos.

Anyway, without further ado, if you follow this guide  to the letter I’m quite sure you’ll have no problems.

LAMP + WordPress

This is not intended to be a complete HOWTO for Linux (Raspbian), Apache2, PHP, MySQL and  WordPress on a Raspberry Pi 4 4GB. What it is supposed to be is a guide that demonstrates that it is easy to get LAMP + WordPress going on a Pi with some links to the documentation that I used.

Assuming you’ve got your Pi and possibly some external storage it’s important to plan out what you’re trying to accomplish and how you want to go about it.

So, I had a 4GB Pi4 as well as a Sandisk Extreme external SSD. First step was to get the latest Raspbian (Buster) in an SD card and booting. Once that was accomplished I installed Apache2 and got that working properly. MySQL / MariaDB was the next cab off the rank followed by PHP and php-mysql.

After each step it’s a damn good idea to make good and sure that what you’ve just installed works properly.

Downloading and installing WordPress was quite possibly the easiest part of the whole process.

For each of the LAMP components there is a heap of available documentation available – remember that Google is your friend. The Raspberry Pi Forums are a brilliant resource. The MariaDB documentation is comprehensive to say the least as is the PHP documentation. There is more WordPress documentation than any mortal could ever want.

So, the steps I followed were :-

  1. Get Raspbian working.
  2. Download, install and get Apache2 working.
  3. If you are going to get SSL working this is when you’d do. I decided not to and just skipped it.
  4. Download and get MariaDB installed and working.
  5. Get PHP and php-mysql downloaded, installed and working.
  6. Get the latest version of WordPress downloaded and installed.
  7. In MySQL reate the WordPress user and the WordPress database.
  8. Set up the privileges for the user.
  9. Configuring WordPress is pretty trivial IF you follow the WordPress procedures.

This is a much more complete HOWTO.

Once I got it all working I set about getting all my stuff over from an ISP’s server. Lots of copying and pasting is all it took.

Once I got it all over I started messing around with WordPress themes and layouts. The choices are bewildering and the theme and layout of this site is a “first attempt mess” which I’ll refine as I work out what I want and how to get there.

At this point I decided that a 32GB SD card probably wouldn’t be enough so I decided to press a Sandisk Extreme 500GB SSD into service. I found a great HOWTO on the  Raspberry Pi Forums and it worked first time. I’ll put that procedure into another post.